10. Wireless
RAD-4G devices support IEEE 802.11ac (WiFi 5) with data transmission rates up to 867 Mbps (Dual Band, MU-MIMO), 802.11r fast transition.
10.1. SSIDS
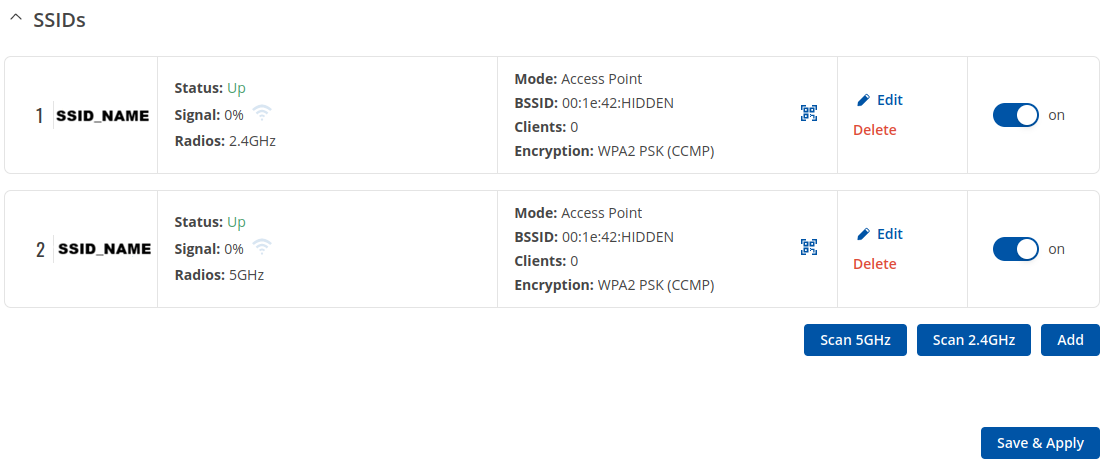
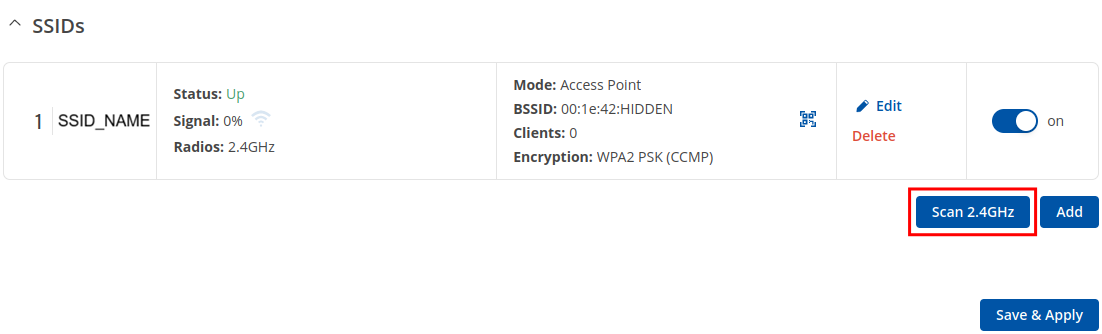
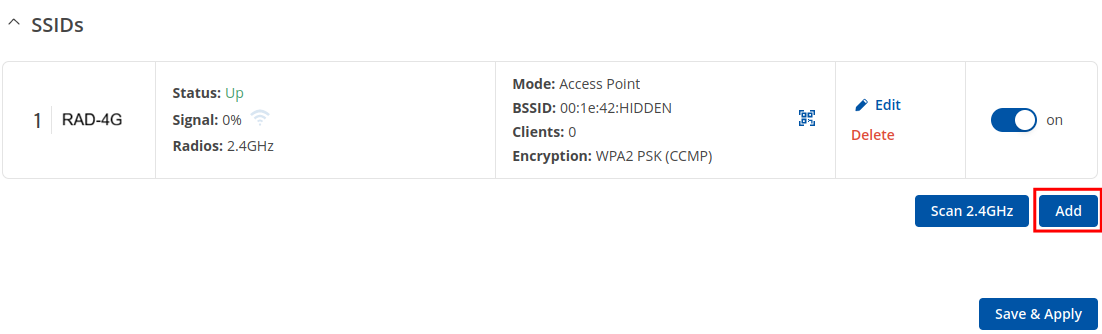
The SSIDs section is used to configure your wireless access points (AP) and wireless clients (STA).
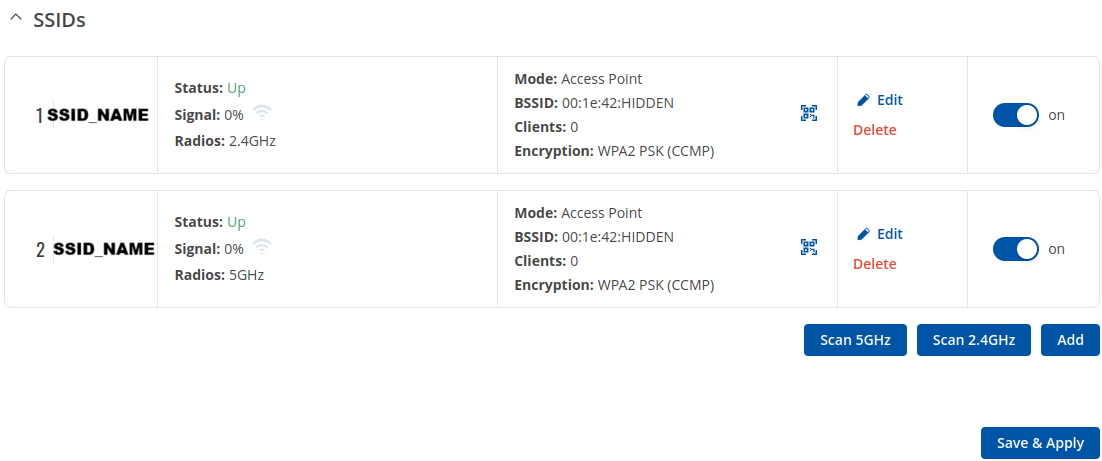
Above is the overview of the SSIDS Overview window. It displays active access pointsand stations. Here you can turn on or off your WiFi interfaces, remove them or start configuring by clicking on
Edit button on the right side of interface.To configure your Wireless device as Client press Scan button to scan the surrounding area and attempt to connect to a new wireless access point.
10.2. Radio
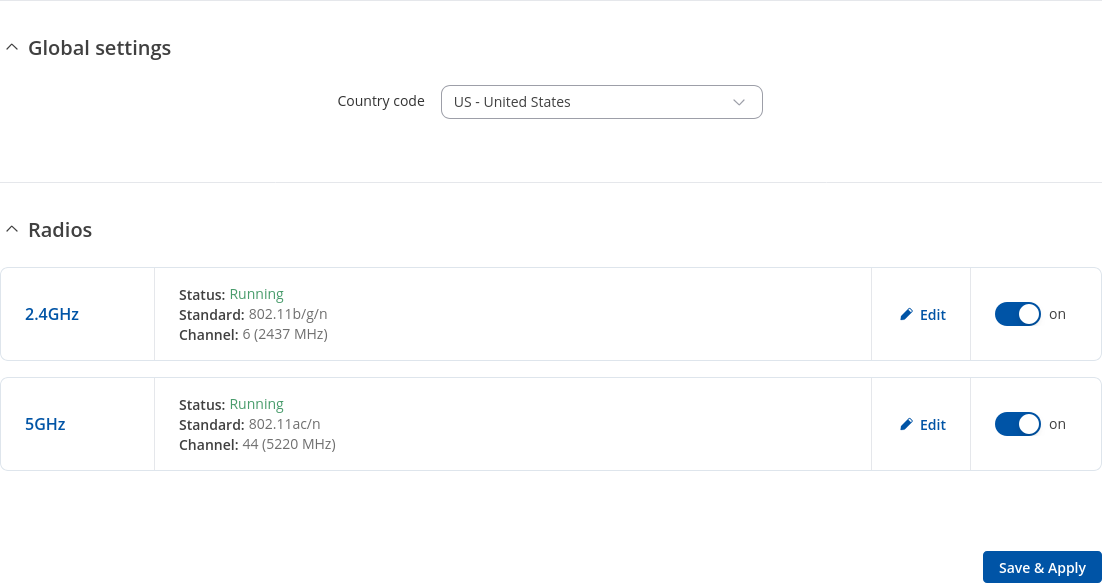
The Global Settings section is used for configuring the country code which is used for regulatory purposes (different areas allow different maximum transmit power and operating frequencies) and WiFi hardware parameters. You can change parameters by clicking the ‘Edit’ button next to a wireless device (not an interface) in the Network → SSIDS page:
Field |
Value |
Description |
|---|---|---|
Country code |
country code; default: US - United States |
SO/IEC 3166 alpha2 country codes as defined in ISO 3166-1 standard. |
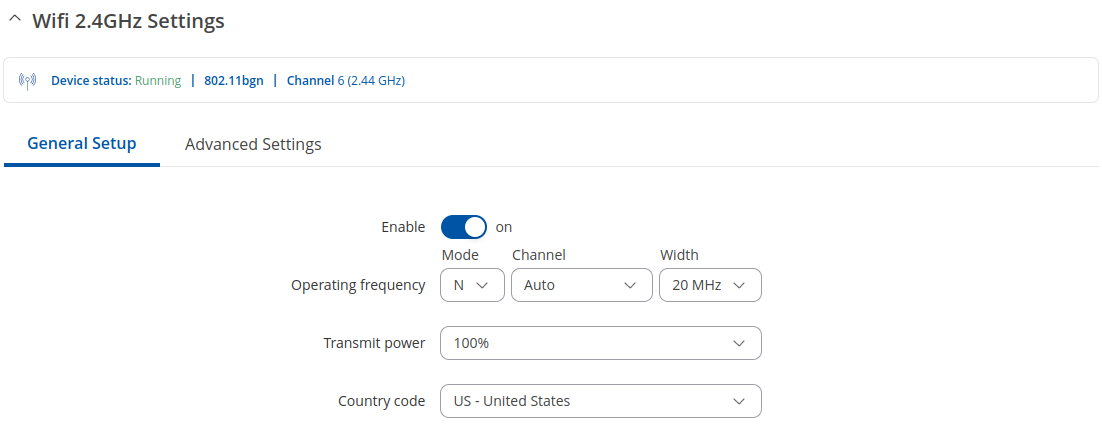
10.2.1. General Setup
The General Setup section is used to turn a wireless device on or off, select the operating frequency (WiFi mode, channel and channel width) and transmit power.
A wireless 2.4 GHz WiFi channel requires a signaling band roughly 22 MHz wide, radio frequencies of neighboring channels numbers significantly overlap each other. Choose a WiFi channel according to the busyness of other channels. You can download a free WiFi analyzer app on your phone, laptop or other WiFi device and check which channel is the least populated.
Many home networks utilize routers that by default run on channel 6 on the 2.4 GHz band. Neighboring WiFi home networks that run over the same channel generate radio interference that can cause significant network performance slowdowns for users. Reconfiguring a network to run on a different wireless channel helps minimize these slowdowns. Therefore, pick a channel with no other active Access Points and preferably one that has no active Access Point on two adjacent channels on each side as well. If you don’t feel like doing this, set the ‘Channel’ field to Auto and the device will pick the least busy channel in your location automatically.
Field |
Value |
Description |
|---|---|---|
Enable |
off | on; default: on |
Turns Wireless device on or off. |
Operating Frequency (2.4 GHz) |
||
Mode |
N | Legacy; default: N |
Wireless N (802.11n) supports a maximum theoretical transfer rate of 300mbps with 2 antennas. It can reach up to 450 Mbps with 3 antennas. Though typical speeds are more accurately around 130 Mbps. The legacy standards include 802.11a, 802.11b, and 802.11g. |
Channel |
Auto | 1 (2412 MHz) | 2 (2417 MHz) | 3 (2422 MHz) | 4 (2427 MHz) | 5 (2432 MHz) | 6 (2437 MHz) | 7 (2442 MHz) | 8 (2447 MHz) | 9 (2452 MHz) | 10 (2457 MHz) | 11 (2462 MHz); default: Auto |
A wireless 2.4 GHz WiFi channel requires a signaling band roughly 22 MHz wide, radio frequencies of neighboring channels numbers significantly overlap each other. Therefore, pick a channel with no other active Access Points and preferably one that has no active Access Point on two adjacent channels on each side as well. |
Width |
20 MHz | 40 MHz; default: 20 MHz |
A 40 MHz channel width bonds two 20 MHz channels together, forming a 40 MHz channel width; therefore, it allows for greater speed and faster transfer rates. But not if those channels are crowded with noise and interference. In crowded areas with a lot of frequency noise and interference, a single 20MHz channel will be more stable. 40MHz channel width allows for greater speed and faster transfer rates but it doesn’t perform as well in crowded areas. |
Operating Frequency (5 GHz)
Mode |
N | AC; default: AC |
Choose between 802.11n and 802.11ac standards. |
|---|---|---|
Channel |
Auto | 36(5180 MHz) | 40(5200 MHz) | 44(5220 MHz) | 48(5240 MHz) | 52(5260 MHz) | 56(5280 MHz) | 60(5300 MHz) | 64(5320 MHz) | 68(5340 MHz) | 72(5360 MHz) | 76(5380 MHz) | 80(5400 MHz) | 84(5420 MHz) | 88(5440 MHz) | 92(5460 MHz) | 96(5480 MHz) | 100(5500 MHz) | 104(5520 MHz) | 108(5540 MHz) | 112(5560 MHz) | 116(5580 MHz) | 120(5600 MHz) | 124(5620 MHz) | 128(5640 MHz) | 132(5660 MHz) | 136(5680 MHz) | 140(5700 MHz) | 144 (5720 MHz) | 149 (5745 MHz) | 153 (5765 MHz) |157 (5785 MHz) | 161 (5805 MHz) | 165 (5825 MHz); default: Auto |
A wireless 5 GHz WiFi channel also requires a signaling band roughly 22 MHz wide, but since its channel with is 20 MHZ ir overlaps less with neighboring channels, but it is still recommended to pick a channel with no other active Access Points and preferably one that has no active Access Point on two adjacent channels on each side as well. |
Width |
20 MHz | 40 MHz | 80 MHz ; default: 80MHz |
A 40 MHz channel width bonds two 20 MHz channels together, forming a 40 MHz channel width, 8 MHZ channel bonds four 20 MHz channels; therefore, it allows for greater speed and faster transfer rates. But not if those channels are crowded with noise and interference. In crowded areas with a lot of frequency noise and interference, a single 20MHz channel will be more stable. 80 MHz width channel is faster than 40MHz which is faster than 20 MHz but it doesn’t perform as well in crowded areas. |
Transmit Power |
[5%…100%]; default: 100 % |
The transmit power of an access point radio is proportional to its effective range – the higher the transmit power, the more distance that a signal can travel, and/or the more physical materials that it can effectively penetrate and still have data successfully resolved at the receiver. |
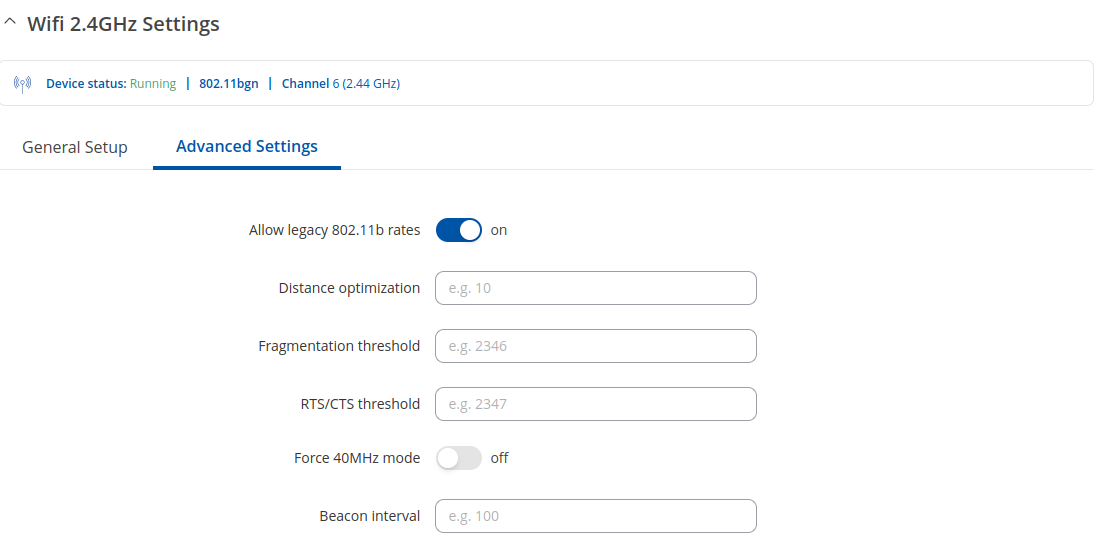
10.2.2. Advanced Settings
The Advanced Settings section is used to configure how the wireless Access Point will work from a hardware perspective.
Field |
Value |
Description |
|---|---|---|
Operating Frequency (2.4 GHz) |
||
Allow legacy 802.11b rates |
off | on; default: on |
Turn on to enable connections that uses legacy 802.11b standard. |
Distance Optimization |
integer [0..65535]; default: none |
HT Distance to farthest network member in meters. |
Fragmentation threshold |
integer [256..2346]; default: none |
The smallest packet size that can be fragmented and transmitted by multiple frames. In areas were interference is a problem, setting a lower fragment threshold might help reduce the probability of unsuccessful packet transfers, thus increasing speed |
RTS/CTS threshold |
integer [0..2347]; default: none |
RTS/CTS (Request to Send/Clear to Send) are mechanisms, used to reduce frame collisions introduced by the hidden node problem. It can help resolve problems arising when several access points are in the same area, contending |
Force 40MHz mode |
off | on; default: off |
Always use 40MHz channels even if the secondary channel overlaps. Using this option does not comply with IEEE 802.11n-2009! |
Beacon interval |
integer [15..65535]; default: none |
Beacon signal interval in seconds. |
Operating Frequency (5 GHz) |
||
Distance Optimization |
integer [0..65535]; default: none |
HT Distance to farthest network member in meters. |
Fragmentation threshold |
integer [256..2346]; default: none |
The smallest packet size that can be fragmented and transmitted by multiple frames. In areas were interference is a problem, setting a lower fragment threshold might help reduce the probability of unsuccessful packet transfers, thus increasing speed |
RTS/CTS threshold |
integer [0..2347]; default: none |
RTS/CTS (Request to Send/Clear to Send) are mechanisms, used to reduce frame collisions introduced by the hidden node problem. It can help resolve problems arising when several access points are in the same area, contending |
Force 40MHz mode |
off | on; default: off |
Always use 40MHz channels even if the secondary channel overlaps. Using this option does not comply with IEEE 802.11n-2009! |
Beacon interval |
integer [15..65535]; default: none |
Beacon signal interval in seconds. |
ACS exclude DFS |
off | on; default: off |
Turn this option on to exclude DFS channels from automatic channel selection. |
10.3. SSIDs Configuration
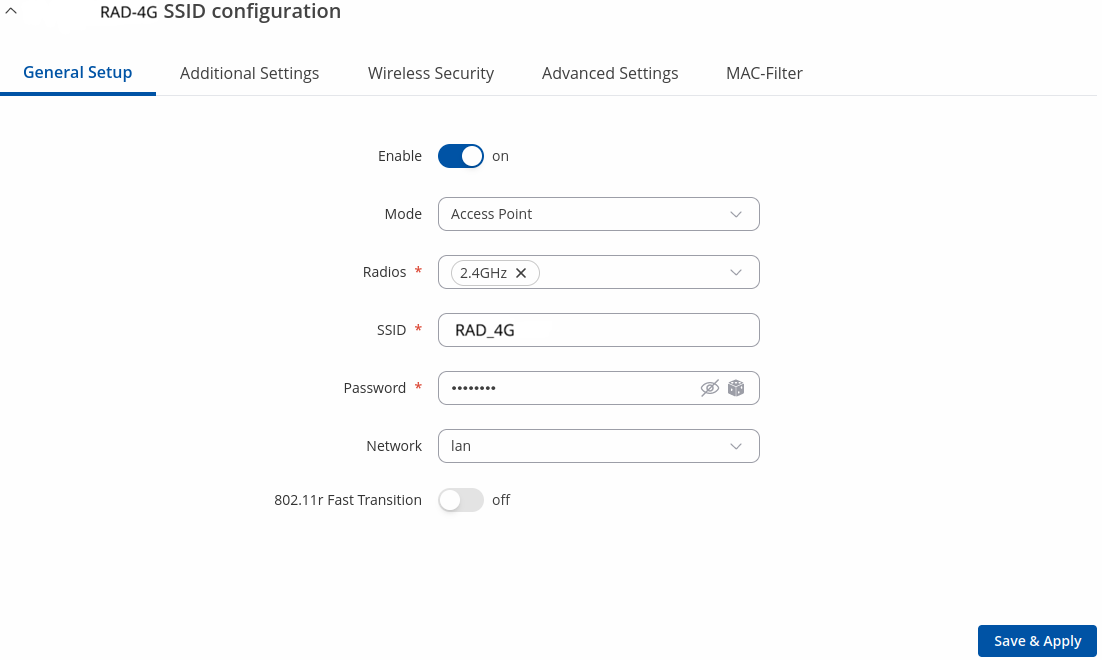
The Interface Configuration section is used to configure the parameters of Wireless Access Points or Clients. You can find this section by clicking the ‘Edit’ button next to a wireless interface (not a device) in the Network → SSIDs page:
10.3.1. General Setup
The General Setup tab contains basic options for SSID and network interface.
Field |
Value |
Description |
|---|---|---|
Enable |
off | on; default: on |
Enables or disables WiFi interface. |
Mode |
Client | Access Point | Mesh | Multi AP; default: Access Point |
Defines what role this interface will do, Access point to supply WiFi for other devices, Client to use other devices WiFi for WWAN and Mesh to act as mesh network gateway or a node in a mesh network. |
Access Point mode |
||
Radios |
2.4 GHz | 5GHz; default: 2.4 GHz or 5 GHz |
SSID will use these radios. Use one of them if you want seperate SSIDs for each radio or use all of them if you want combined SSID. |
SSID |
Factory SSID is different for every device; default: |
Service Set Identifier is a name used to identify access point which is shown when client tries to connect to it. |
Password |
string; default: none |
|
Network |
network interfaces | +add new; default: lan |
Choose the network(s) you want to attach to this wireless interface or fill out the create field to define a new network. |
802.11r Fast Transition |
off | on; default: off |
Enables fast roaming among access points that belong to the same Mobility Domain |
Client mode |
||
Auto-reconnect |
on | off; default: on |
Enables automatic reconnection to the configured access point on connection loss. |
Radios |
2.4 GHz | 5GHz; default: 2.4 GHz or 5 GHz |
SSID will use these radios. Use one of them if you want seperate SSIDs for each radio or use all of them if you want combined SSID. |
SSID |
Factory SSID is different for every device; default: |
Extended Service Set Identifier is a name used to identify access point to which client will connect. |
BSSID |
mac address; default: none |
Basic service set identifier. |
Password |
string; default: none |
|
Network |
network interfaces; default: Auto |
Choose the network you want to attach to this wireless interface or fill out the Custom field to define a new network (you will be redirected to the newly created network configuration page). |
Mesh mode |
||
Mesh ID |
integer; default: none |
Mesh network identifier. |
Radios |
2.4 GHz | 5GHz; default: 2.4 GHz or 5 GHz |
SSID will use these radios. Use one of them if you want seperate SSIDs for each radio or use all of them if you want combined SSID. |
Password |
string; default: none |
|
Network |
network interfaces; default: Auto |
Choose the network you want to attach to this wireless interface or fill out the Custom field to define a new network (you will be redirected to the newly created network configuration page). |
Multi AP |
||
Radios |
2.4 GHz | 5GHz; default: 2.4 GHz or 5 GHz |
SSID will use these radios. Use one of them if you want seperate SSIDs for each radio or use all of them if you want combined SSID. |
Network |
network interfaces; default: Auto |
Choose the network you want to attach to this wireless interface or fill out the Custom field to define a new network (you will be redirected to the newly created network configuration page). |
Scan time (sec) |
number; default: 60 |
Time between scans of available access points (minimum 30 sec.) |
Upload AP list |
|
Uploads a list of access point configurations. |
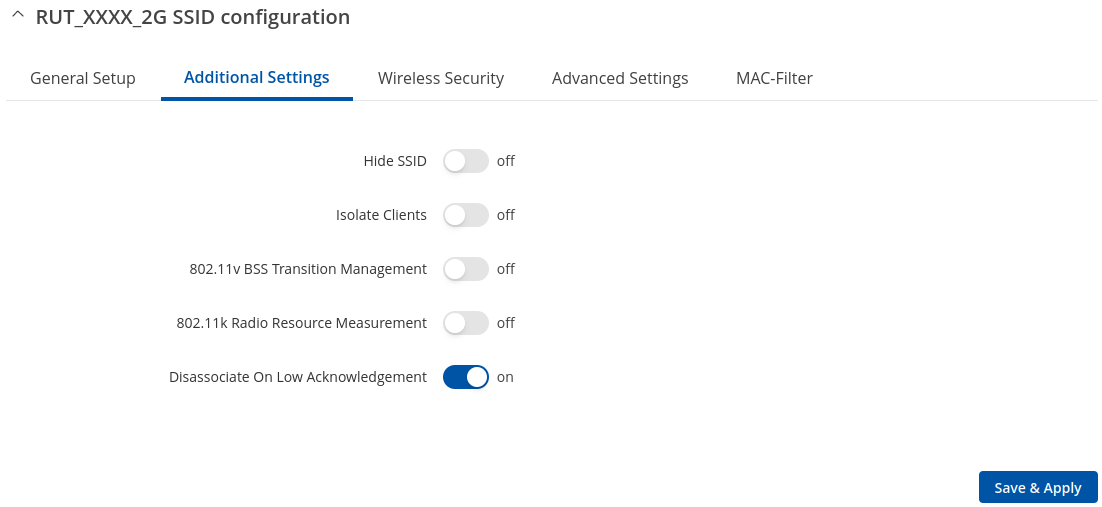
10.3.2. Additional Settings
Field |
Value |
Description |
|---|---|---|
Access point |
||
Hide SSID |
on | off; default: off |
Hide Service Set Identifier |
Isolate Clients |
off | on; default: off |
Prevents client to client communication on the same subnet. |
802.11v BSS Transition Management |
on | off; default: off |
A suggestion (or advice) given to a client, which the client can choose to follow or ignore |
802.11k Radio Resource Measurement |
on | off; default: off |
Helps devices search quickly for nearby APs that are available as roaming targets by creating an optimized list of channels. |
Disassociate On Low Acknowledgement |
off | on; default: on |
Allow AP mode to disconnect stations/clients based on low Acknowledgement condition. |
Field |
Value |
Description |
|---|---|---|
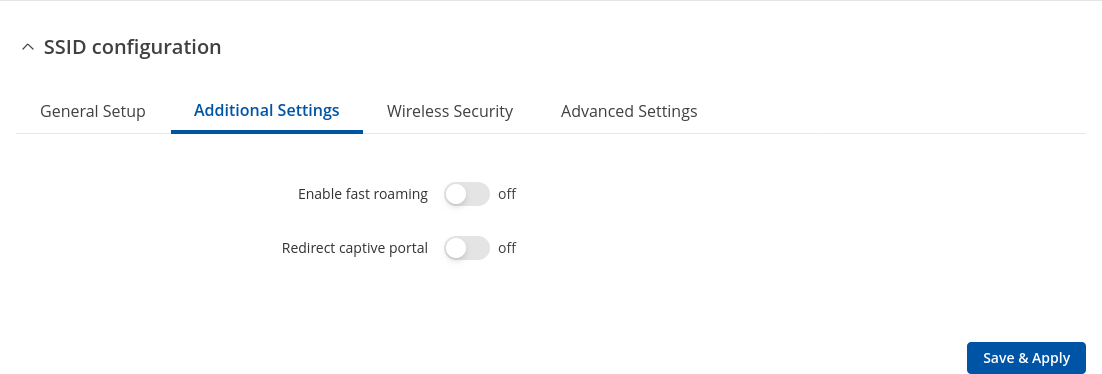
Client & Multi AP |
||
Enable fast roaming |
off | on; default: off |
Requests background scans for the purpose of roaming within an ESS. |
Redirect captive portal |
off | on; default: off |
Also known as Travelmate. Enables captive portal redirection. |
Field |
Value |
Description |
|---|---|---|
Mesh |
||
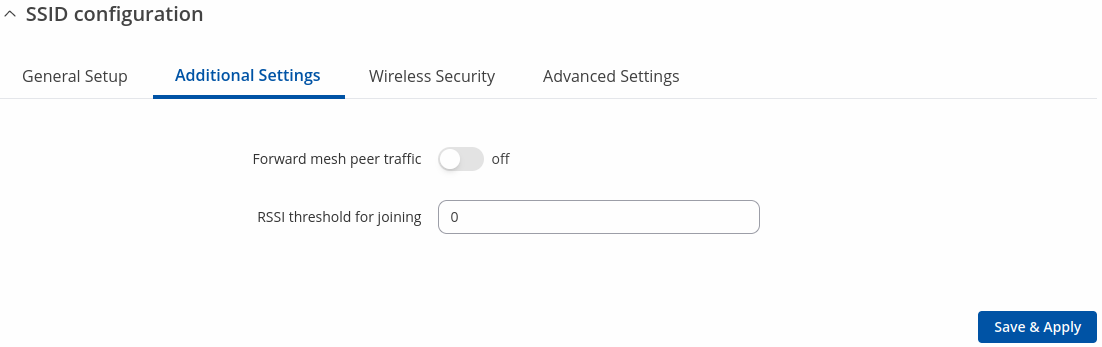
Forward mesh peer traffic |
off | on; default: off |
Enables mesh peer traffic forwarding. |
RSSI threshold for joining |
integer [0..1]; default: 0 |
0 = not using RSSI threshold, 1 = do not change driver default. |
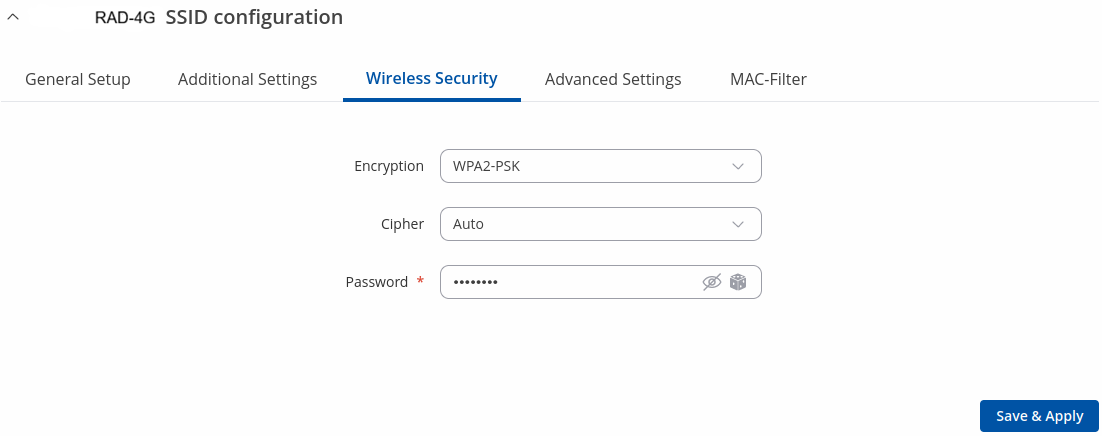
10.3.3. Wireless Security
The Wireless Security tab is used to determine what kind of encryption your WLAN will use.
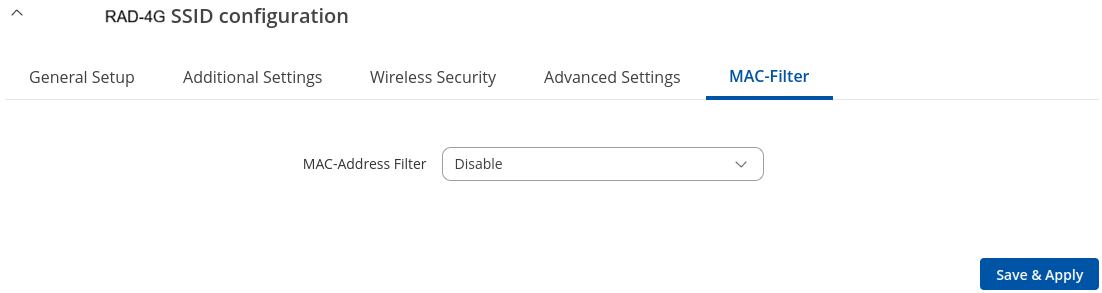
10.3.4. MAC Filter
The MAC Filter tab is used for setting up rules that allow or exclude devices with specified MAC addresses from connecting to your WiFi network. This tab is only visible when Wireless interface Mode is set to Access Point.
Field |
Value |
Description |
|---|---|---|
MAC-address filter |
Disable | Allow listed only | Allow all except listed; default: Disable |
Defines how the MAC Filter should function. Allow listed only – only allows devices with specified MAC addresses to connect to your Wireless Access Point. Allow all except listed - blocks devices with specified MAC addresses from connecting to your Wireless Access Point. |
MAC-List |
MAC; default: none |
List of MAC addresses to be included or excluded from connecting to your Wireless Access Point. |
Remove from whitelist |
off | on; default: off |
Enables MAC removal from whitelist when device reaches IP block counter. |
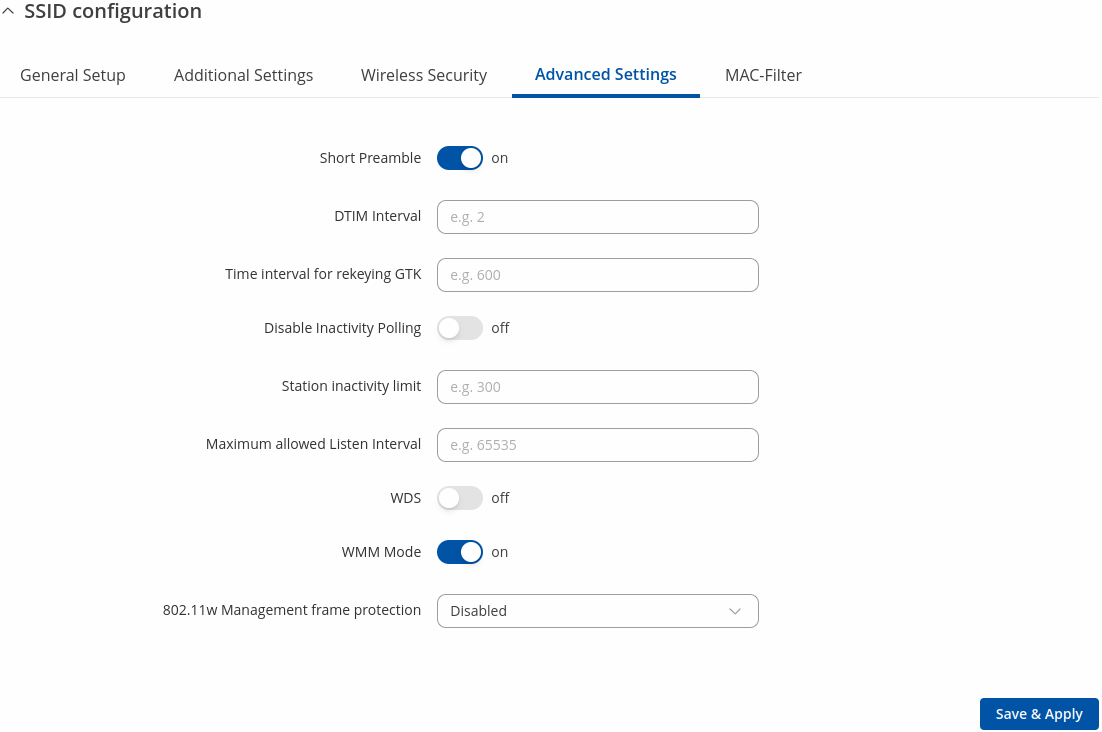
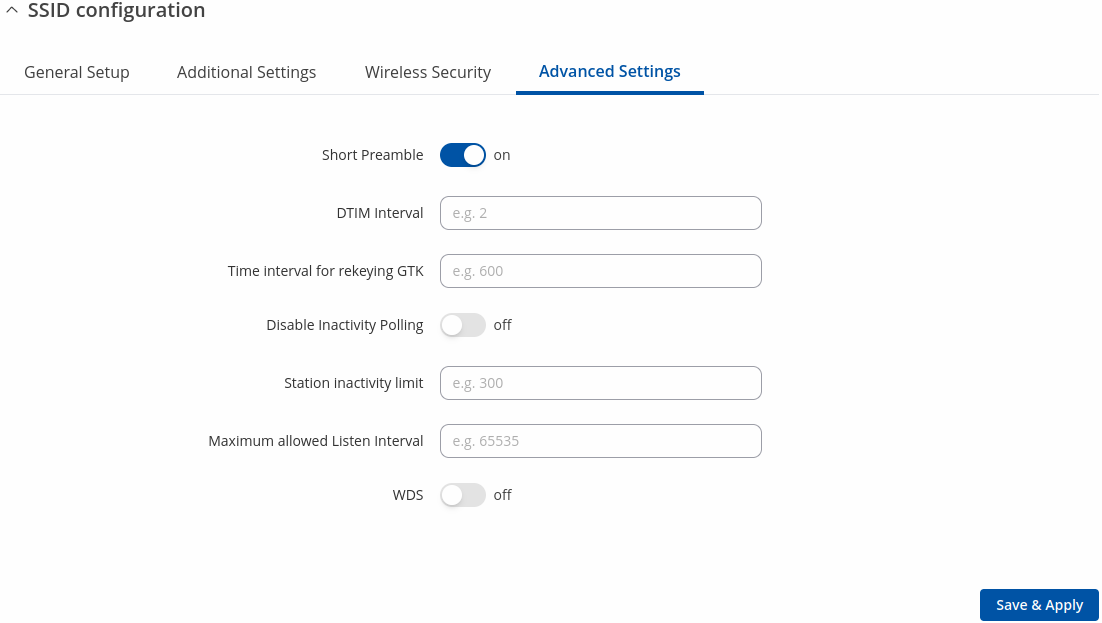
10.3.5. Advanced Settings
Field |
Value |
Description |
|---|---|---|
Access point |
||
Short Preamble |
off | on; default: on |
Uses Short Preamble, it uses shorter data strings that adds less data to transmit the error redundancy check which means that it is much faster. |
DTIM interval |
seconds; default: none |
Delivery Traffic Indication Message Interval. |
Time interval for rekeying GTK |
seconds; default: none |
Period of time in between automatic changes of the group key, which all devices on the network share. |
Disable Inactivity Polling |
off | on; default: off |
Inactivity polling can be disabled to disconnect stations based on inactivity timeout so that idle stations are more likely to be disconnected even if they are still in range of the AP. |
Station inactivity limit |
seconds; default: none |
Station inactivity limit in seconds. If a station/client does not send anything in st time frame, an empty data frame is sent to it in order to verify whether it is still in range. If this frame is not acknowledged, the station will be disassociated and then deauthenticated. |
Maximum allowed Listen Interval |
positive integer; default: none |
Association will be refused if a client/station attempts to associate with a listen interval greater than this value. |
WDS |
off | on; default: off |
A Wireless Distribution System (WDS) is a system that enables the wireless interconnection of access points (APs) in a network. |
WMM Mode |
off | on; default: on |
Wi-Fi Multimedia (WMM), previously known as Wireless Multimedia Extensions (WME), is a subset of the 802.11e wireless LAN (WLAN) specification that enhances quality of service (QoS) on a network by prioritizing data packets according to four categories. |
802.11w Management frame protection |
Disabled | Optional | Required; default: Disabled |
Enables Management frame protection (MFP or PMF). By default it is set to ‘Required’ when using WPA3 encryption. |
Field |
Value |
Description |
|---|---|---|
Client |
||
Short Preamble |
off | on; default: on |
Uses Short Preamble, it uses shorter data strings that adds less data to transmit the error redundancy check which means that it is much faster. |
DTIM interval |
seconds; default: none |
Delivery Traffic Indication Message Interval. |
Time interval for rekeying GTK |
seconds; default: none |
Period of time in between automatic changes of the group key, which all devices on the network share. |
Disable Inactivity Polling |
off | on; default: off |
Inactivity polling can be disabled to disconnect stations based on inactivity timeout so that idle stations are more likely to be disconnected even if they are still in range of the AP. |
Station inactivity limit |
seconds; default: none |
Station inactivity limit in seconds. If a station/client does not send anything in st time frame, an empty data frame is sent to it in order to verify whether it is still in range. If this frame is not acknowledged, the station will be disassociated and then deauthenticated. |
Maximum allowed Listen Interval |
positive integer; default: none |
Association will be refused if a client/station attempts to associate with a listen interval greater than this value. |
WDS |
off | on; default: off |
A Wireless Distribution System (WDS) is a system that enables the wireless interconnection of access points (APs) in a network |
Field |
Value |
Description |
|---|---|---|
Mesh & Multi AP |
||
Short Preamble |
off | on; default: on |
Uses Short Preamble, it uses shorter data strings that adds less data to transmit the error redundancy check which means that it is much faster. |
DTIM interval |
seconds; default: none |
Delivery Traffic Indication Message Interval. |
Time interval for rekeying GTK |
seconds; default: none |
Period of time in between automatic changes of the group key, which all devices on the network share. |
Disable Inactivity Polling |
off | on; default: off |
Inactivity polling can be disabled to disconnect stations based on inactivity timeout so that idle stations are more likely to be disconnected even if they are still in range of the AP. |
Station inactivity limit |
seconds; default: none |
Station inactivity limit in seconds. If a station/client does not send anything in st time frame, an empty data frame is sent to it in order to verify whether it is still in range. If this frame is not acknowledged, the station will be disassociated and then deauthenticated. |
Maximum allowed Listen Interval |
positive integer; default: none |
Association will be refused if a client/station attempts to associate with a listen interval greater than this value. |
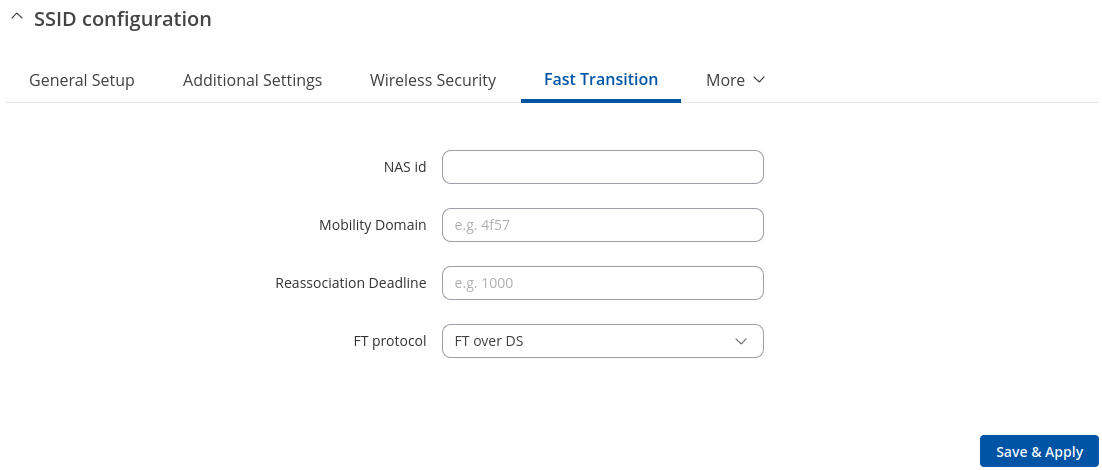
10.3.6. Fast Transition
The Fast Transition tab is only available when in General setup section 802.11r Fast Transition option is enabled.
Field |
Value |
Description |
|---|---|---|
NAS id |
string; default: empty |
Used for fast transition and Radius server. |
Mobility Domain |
HEX string; default: empty |
4-character hexadecimal ID |
Reassociation Deadline |
integer [1000..65535]; default: empty |
Time units (TUs / 1.024 ms) |
FT protocol |
FT over DS | FT over Air; default: FT over DS |
Defines how nagotiation will happen using Fast Transition protocol. |
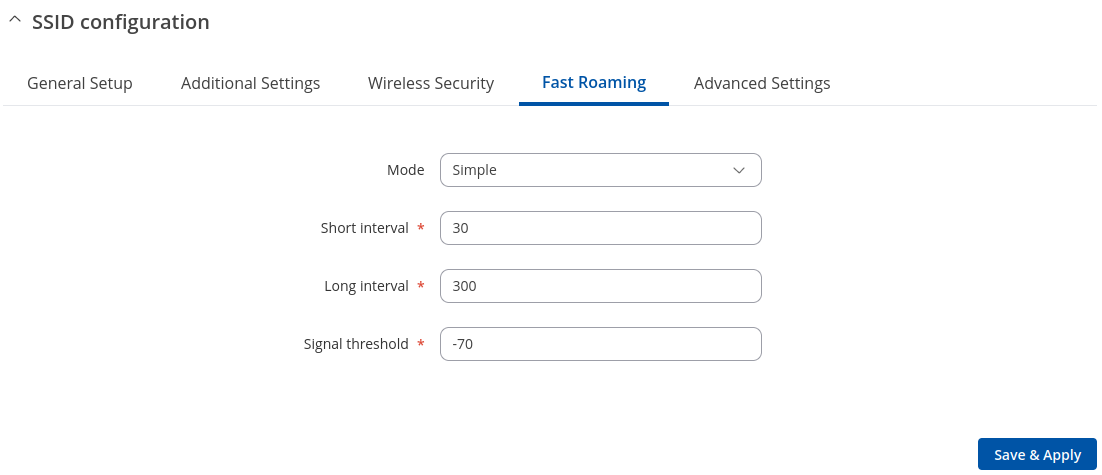
10.3.7. Fast Roaming
The Fast Roaming tab is only available when in General setup section Client mode is selected and in Advanced settings tab Enable fast roaming option is enabled.
Field |
Value |
Description |
|---|---|---|
Mode |
Simple | Learn; default: Simple |
Defines how the Fast transition should function.
|
Short interval |
integer [5..86400]; default: 30 |
Defines the interval between background scans (in seconds) if the actual signal level of the currently connected access point is worse than signal threshold |
Long interval |
integer [5..86400]; default: 300 |
Defines the interval between background scans (in seconds) if the actual signal level of the currently connected access point is better than signal threshold |
Signal threshold |
integer [-90..-30]; default: -70 |
Defines a threshold (in dBm) that determines if short interval or longer interval will be used |
10.4. Configuration examples
10.4.1. Client Mode
RAD-4G can also work as a WiFi client. Configuring client mode is nearly identical to Access Point, except for the fact that most of the options are dictated by the WiFi Access Point that the router is connecting to. Changing them can result in an interrupted connection to that router.
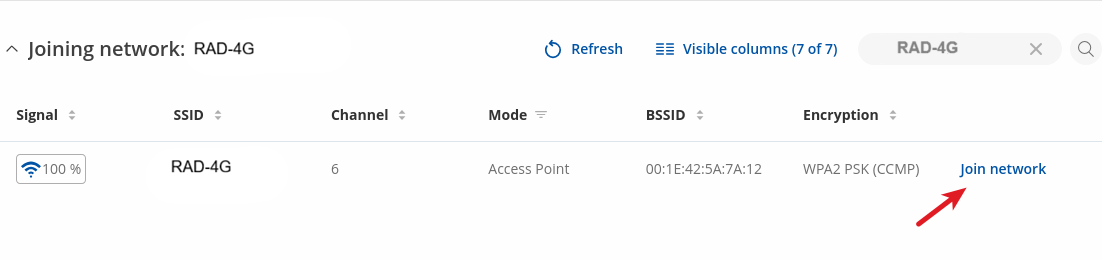
To begin configuring WiFi Client first click the ‘Scan’ button to scan the surrounding area and attempt to connect to a new wireless access point.
After which you will be redirected to the window shown below, where you will see list of available WiFi Access Points in the area. Choose one according to your liking and press the Join Network button next to it.
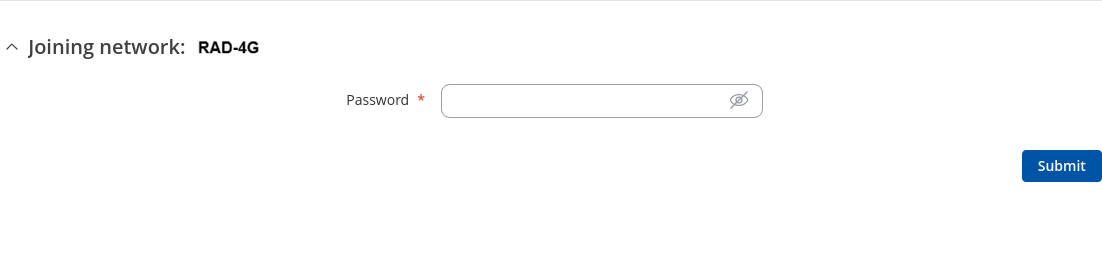
You again will be redirected to following window, where you will need to enter WiFi password.
Next window that opens will be Device Configuration. Values there, mostly, should be left unchanged to avoid connection problems, because they are dictated by Access Point. Other than that, only difference from Access Point settings are in Interface Configuration → General Setup section, where Mode is set to Client, and Network attached to this wireless interface is wifi1 instead of LAN
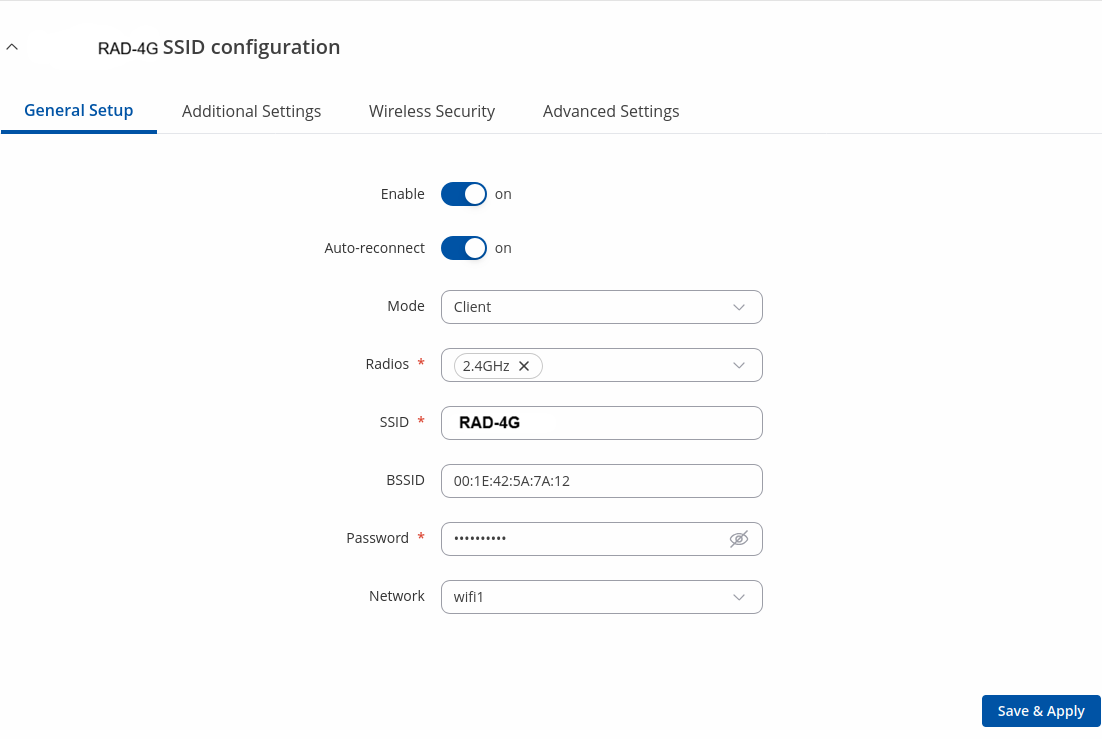
Click Save & Apply and if you configured correctly, you will have Wireless Client working.
10.4.2. Mesh Mode
RAD-4G can also be configured as a mesh gateway or as a node (router) connecting to a mesh gateway.
When RAD-4G is configured as mesh gateway it provides internet access to other mesh nodes. When configured as mesh node it acts as a mesh router which forwards traffic to and from mesh gateway. Nodes also connect other wireless devices to the network such as laptops and cellphones.
Mesh Gateway
When configuring RAD-4G as a mesh gateway internet connectivity is required.
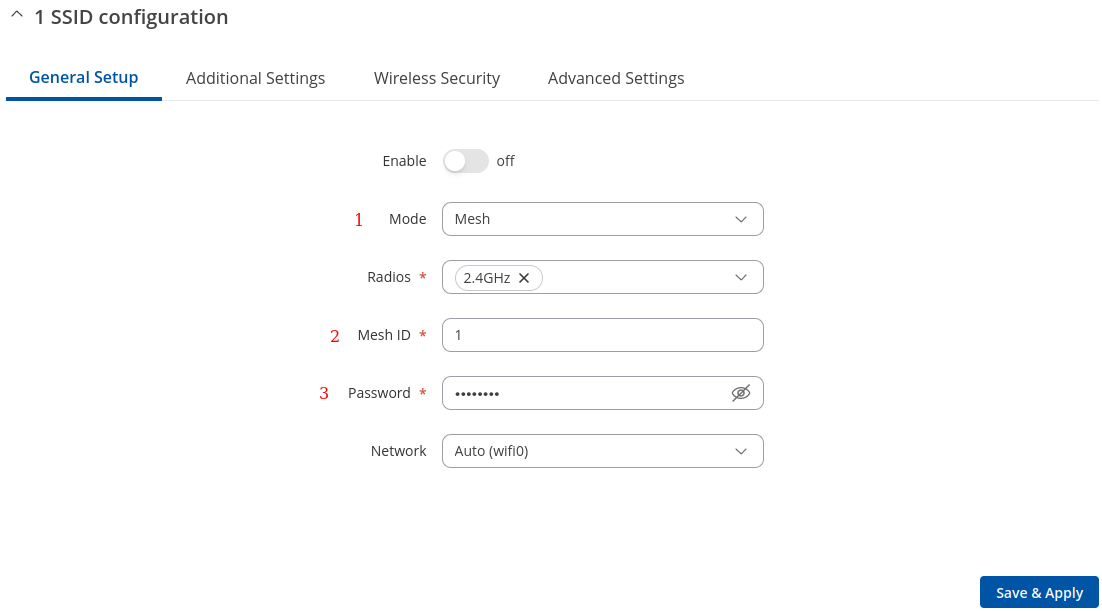
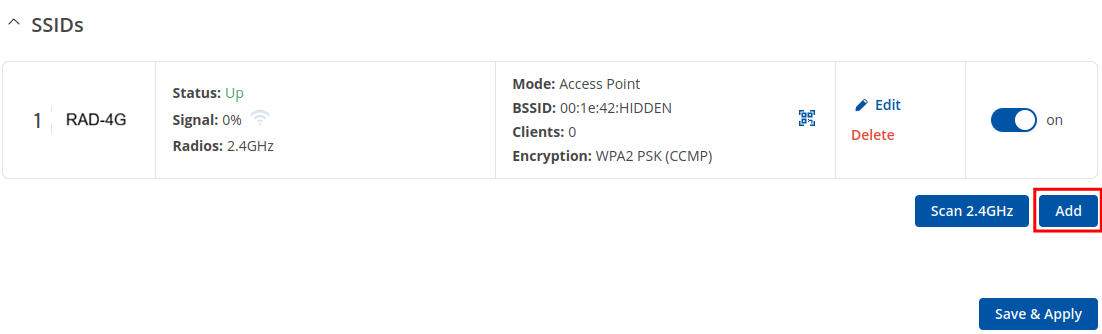
To begin click the ‘Add’ button below of wireless interface in the Network → Wireless page:
In General Setup tab change Mode to Mesh, set Mesh ID (this number has to be the same in all nodes that connect to this wireless mesh network) and select desired Network which will be attached to the interface. Click Save & Apply.
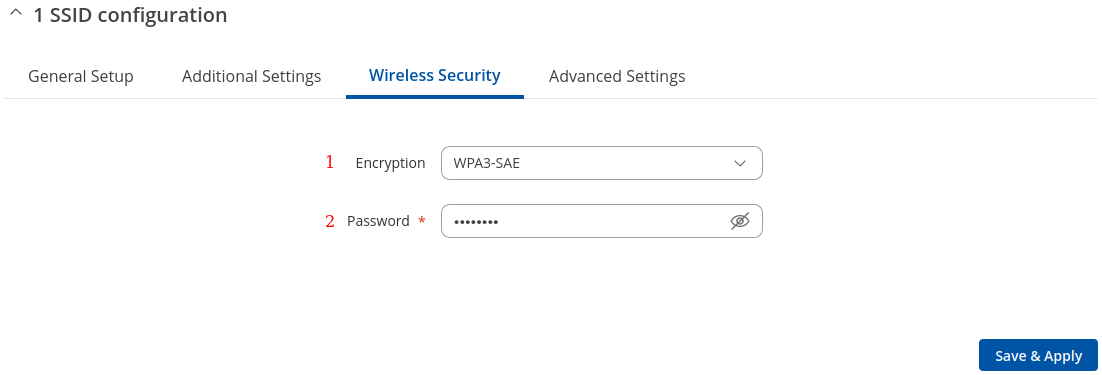
Next navigate to Wireless Security tab and select WPA3-SAE encryption to add authentication layer. The password must match in all devices within the mesh network.
Lastly, in Advanced Settings tab enable Forward mesh peer traffic and set RSSI threshold for joining to -80. Leave the rest as set by default.
Click Save & Apply and if you configured correctly, you will have wireless mesh gateway ready.
Mesh Node
Mesh node is configured the same way as mesh gateway. Node has to match gateway’s wireless mesh interface configuration. Additionally, WAN interface has to be setup as DHCP client:
Access router’s WebUI. Navigate to Network → WAN.
Press edit button on the right of the WAN interface.

Change Protocol to DHCP and select necessary device . Click Save & Apply and If everything was setup correctly, mesh node should be ready use.
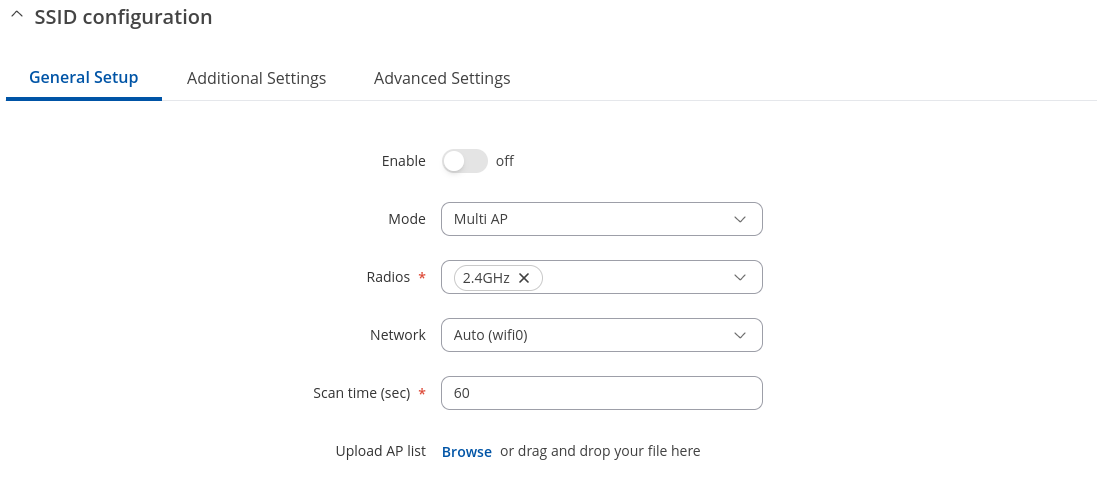
10.4.3. Multi AP
The Multi AP feature is used to configure access to multiple wireless access points from one page. To create Multi AP wireless interface click the ‘Add’ button below of wireless interface in the Network → Wireless page:
In General Setup tab change Mode to Multi AP, select desired Network which will be attached to the interface. You can also select scan time and upload file with Access Points list.
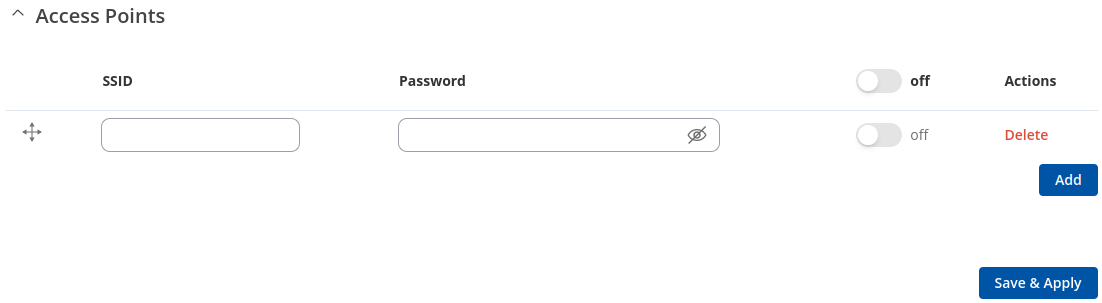
Access Points
You can either configure multiple access points from this page of the WebUI or you can upload a file with a list of access point configurations. The file should contains WiFi access point configuration options and values, which should be defined as option: value (for example, ssid: home_wifi). The SSID option is mandatory.
Field |
Value |
Description |
|---|---|---|
SSID |
string; default: none |
SSID of an access point. |
Key |
string; default: none |
Pre-shared key, a custom passphrase used for user authentication (at least 8 characters long). |
Enable |
off | on; default: off |
Turns an access point configuration on or off. |
Delete |
|
Deletes the access point configuration next to the button. |
Option names in the file should be provided in lower case letters. AP list file example:
ssid: RAD-4G_1
enable: 1
key: 12345678
ssid: RAD_4G_2
enable: 0
key: 87654321
Once uploaded, the contents of the file should become visible in the Access Points list.
10.5. WiFi QR codes
Each WiFi interface has a specially designed QR code that contains information about the SSID and password of the WiFi network. After pressing the button  , a QR code appears with the network’s SSID and password, which you can download locally by pressing the ‘Download’ button. If you only want a QR code without additional information, uncheck the ‘Include credentials’ box.

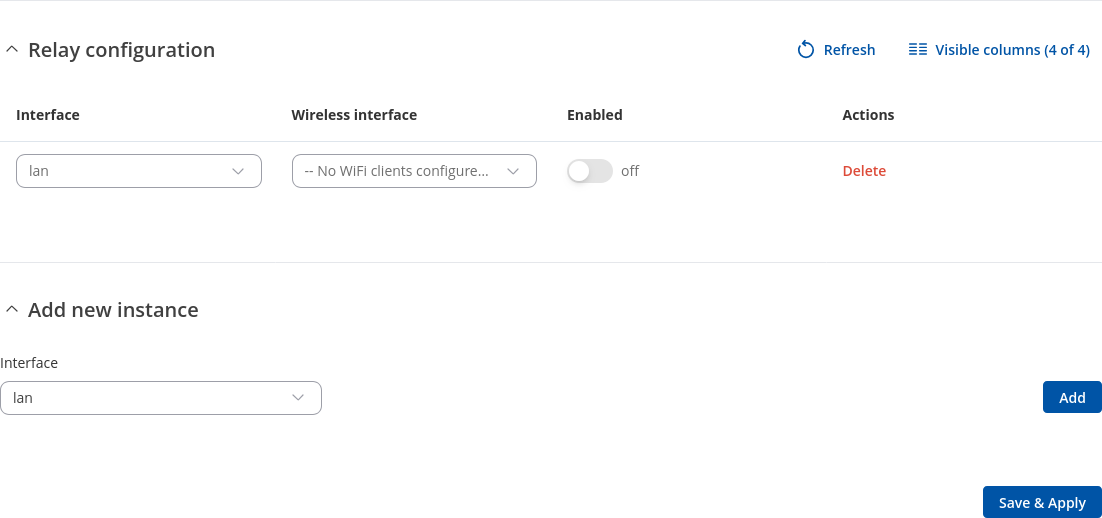
10.6. Relay Configuration
The Relay Configuration section is used to relay and dynamically redirect incoming connections to a target host. Its main purpose is extending the wireless network. For example, when the device is in Wireless Station (client) mode, it can be used to bridge WAN and LAN interfaces to create a larger wireless network.
Field |
Value |
Description |
|---|---|---|
Interface |
network interface; default: none |
Network interface associated with the wireless interface. |
Wireless interface |
network interface; default: none |
Wireless interface associated with the relay configuration. |
Enabled |
off | on; default: off |
Turns the relay configuration on or off. |
Actions |
-(interactive button) |
10.7. PPSK Profiles
The PPSK Profiles page is used to create and manage Private Pre-Shared Key (PPSK) groups for wireless networks. PPSK allows multiple clients to connect to the same SSID using unique pre-shared keys, enabling improved security, user segmentation, and easier access management compared to a single shared password.
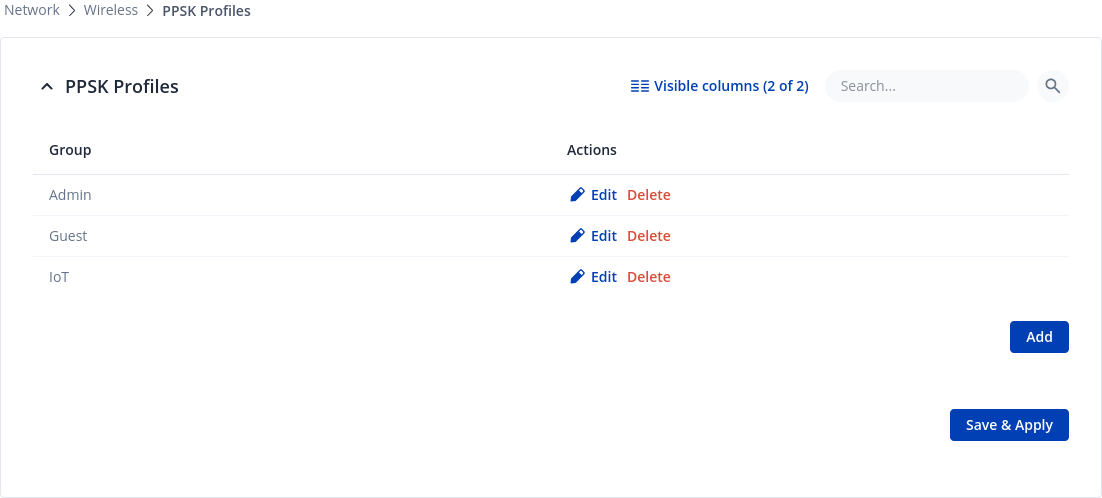
To create a new PPSK profile/group, press the Add button. You will be redirected to the configuration window:
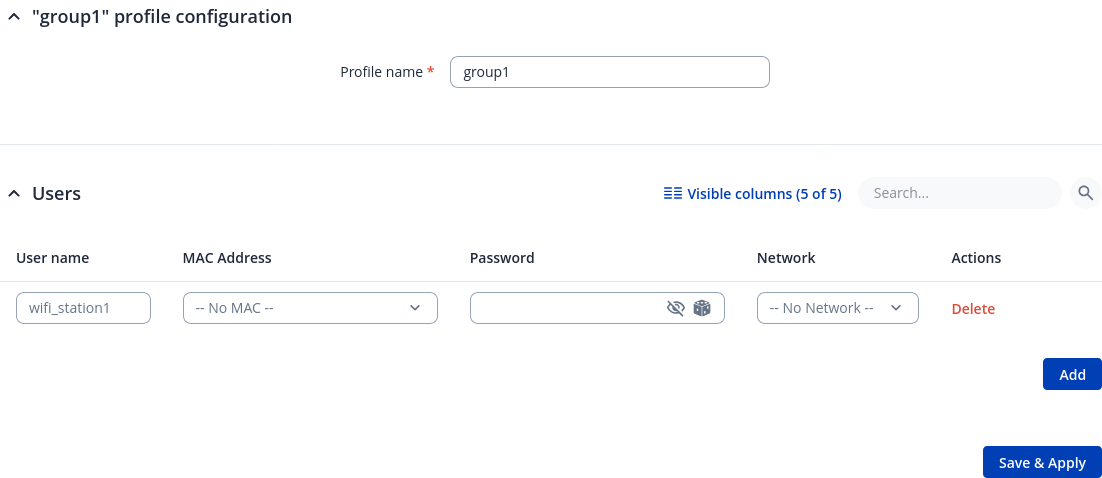
Field |
Value |
Description |
|---|---|---|
Username |
string; default: wifi_station1 |
User name of the authenticating station. Used for easier identification. |
MAC Address |
list of found MAC addresses | Add custom option; default: none |
MAC address to match authenticating stations against (defaults to any station using this key). |
Password |
string; default: none |
PSK to match authenticating stations against. |
Network |
list of networks; default: none |
Network that this station will be assigned to. |
Action |
-(interactive button) - Delete |
Removes users. |